Reduction techniqueTreatment The wrist and hand
18. Reduction technique (a): Anaesthesia is necessary for the reduction of this fracture, and either a general anaesthetic or intravenous regional anaesthetic (Bier block) may be used with success. Although the latter has a good safety record, it should not be employed unless facilities for resuscitation are freely available. Where there is a preference for general anaesthesia but the patient attends late at night with a history of recent intake of food or drink, it is permissible and often safer to apply a temporary plaster back shell and an arm sling, and delay reduction of the fracture till morning.
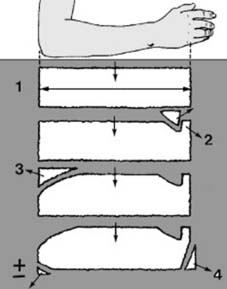
19 Reduction technique (b): Before any manipulation, start by preparing a suitable plaster back slab. The length should equal the distance from the olecranon to the metacarpal heads (1). The width in an adult should be 15 cm (6″), and it should be about eight layers thick. The slab should be trimmed with a tongue (2) for the first web space, a large radial curve to allow elbow flexion (3) and allowance for ulnar deviation (4).
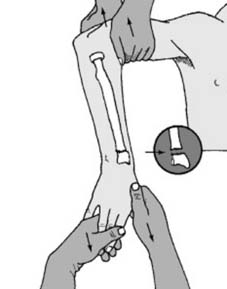
20 Reduction technique (c): The essential first stage in the reduction of a Colles fracture is to disimpact the distal radial fragment. The elbow is flexed to a right angle and the arm held by the interlocked fingers of an assistant (1). Traction is applied in the line of the forearm (2).
21 Reduction technique (d): Traction need only be applied for a few seconds, and disimpaction may be confirmed by holding the distal fragment between the thumb and index. It should be easy to move anteriorly and posteriorly. When disimpacted the radial styloid should lie 1 cm distal to the ulnar styloid.
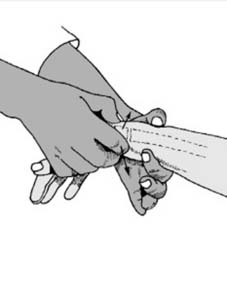
22 Reduction technique (e): The elbow is now extended (1). The heel of one hand should be placed over the dorsal surface of the distal radial fragment, and the fingers curled round the patient’s wrist and palm (2). This grip allows traction to be re-applied to the disimpacted fracture.
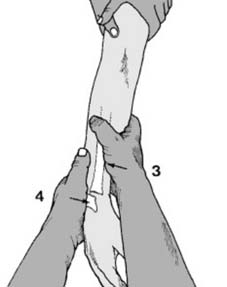
23 Reduction technique (f): Now, by using the heel of the other hand as a fulcrum (3) firm pressure directed anteriorly (4) will correct all the remaining deformities normally visible in lateral radiographs of the wrist (posterior displacement, anterior angulation).
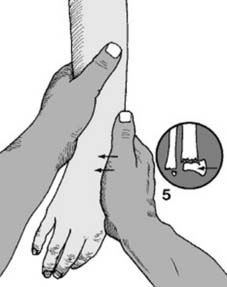
24 Reduction technique (g): Still maintaining traction, alter the position of the grip so that the heel (here of the right hand) is able to push the distal fragment ulnarwards and correct the radial displacement (5). Ulnar angulation, the other deformity seen in the AP radiograph, is corrected by placing the hand in full ulnar deviation at the wrist.
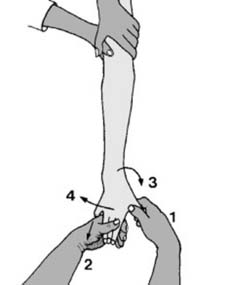
25 Reduction technique (h): Change the grip to allow free application of the plaster (which follows Charnley’s principle of three point fixation). Note that one hand holds the thumb fully extended (1). The other holds three fingers (to avoid ‘cupping’ of the hand) maintaining slight traction (2). The limb should be in full pronation (3), full ulnar deviation at the wrist (4) and slight palmar flexion.
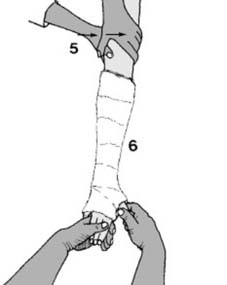
26 Reduction technique (i): Note that the elbow must be extended (either by an assistant (5) or by resting the upper arm against the edge of the table) to maintain this position. The skin may be protected with wool roll (6). If stockingette is preferred, it must be applied prior to reduction.
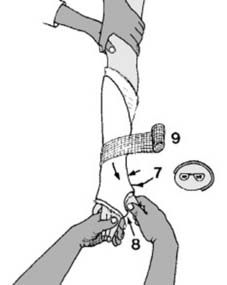
27 Reduction technique (j): The wetted slab should now be positioned so that it covers the anterior, lateral and posterior aspects of the radius (7). The tongue should be carefully turned into the palm (8). The slab should be held in position with two wetted 10 cm (4″) open-weave bandages (cotton, gauze or Kling™ bandages) (9). The end can be secured with a wetted scrap of plaster bandage.
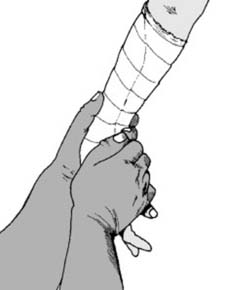
28 Reduction technique (k): Before the plaster sets, many surgeons like to apply further pressure over the posterolateral aspect of the distal fragment, and maintain this until setting occurs (‘final moulding’). This precaution ensures maintenance of the reduction, but care should be taken not to dent the plaster.
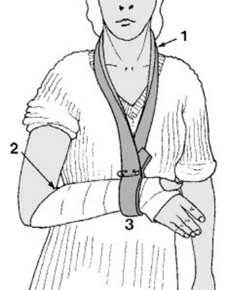
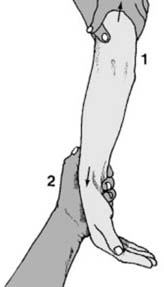
29 Reduction technique (l): A collar and cuff sling should be applied (1). Make sure that there is no constriction at the elbow (2) or at the wrist (3), and try to flex the elbow beyond a right angle so that the forearm is not dependent.
30. Alternative techniques: It is not unexpected that in this common fracture methods of reduction are legion. As it is generally an easy fracture to reduce, it follows that success can rightly be claimed for many techniques. The method given is logical in so far as it correlates with the pathology as seen on the radiographs.

31 Treatment ctd: Check radiographs should be studied. Severe persisting deformity, especially in the AP projection (Illus.) should not be accepted, and remanipulation should be undertaken. If difficulty is anticipated, radiographs may be obtained before discontinuing the anaesthetic. If the position is acceptable, the patient is shown finger exercises and advised regarding normal plaster care.
NEXT