Lateral Approach to the Distal Femur for Anterior Cruciate Ligament Surgery
Discover the "over-the-top" approach! The lateral approach to the distal femur is the key to successful ACL repair or reconstruction. Combined with the medial parapatellar approach, this technique ensures optimal results. Let's dive into the details below!
Improve outcomes with the lateral approach! By gaining access to the posterior aspect of the intercondylar notch and the lateral aspect of the lateral femoral condyle, you can effectively perform necessary procedures like reattaching the femoral end of the ACL or attaching a substitute tendon.
Step 1: Get in Position
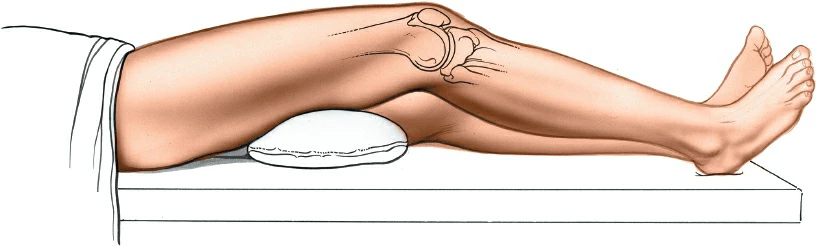
Place the patient comfortably on the table with the knee flexed at 30 degrees. Remember to use a tourniquet and exsanguinate the leg to ensure optimal visibility and control of bleeding.
Step 2: Find Your Landmarks
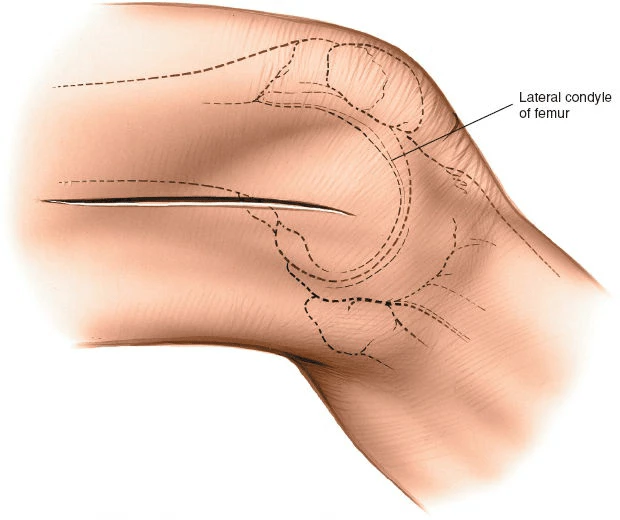
Locate the posterior lateral margin of the lateral femoral condyle and identify the intersection between the iliotibial band and the biceps femoris muscle.
Create a 10-cm incision parallel to the indentation between the biceps femoris muscle and the iliotibial band. The incision should end at the flare of the femoral condyle.
Step 3: Find the Internervous Plane
Take advantage of the internervous plane between the vastus lateralis muscle (supplied by the femoral nerve) and the biceps femoris muscle (supplied by the sciatic nerve). This allows for a smoother dissection.
Step 4: Start Surgical Dissection
Make an incision in the iliotibial band just anterior to the lateral intermuscular septum, aligned with the skin incision. Be slightly anterior to the actual skin incision.
Step 5: Go Deeper
Expose the vastus lateralis muscle, retracting it anteriorly and medially. Beneath the muscle, you'll find the lateral superior genicular artery. Ligating it ensures a smooth procedure. Use cautery to incise the periosteum at the shaft and flare junction of the femur. Carry out a careful dissection, staying in a subperiosteal plane, until you can enter the intercondylar notch over the top of the lateral femoral condyle. Pass the instrument anteriorly, staying close to the bone, until it's visible from the anteromedial incision (medial parapatellar).
Step 6: Watch Out for Dangers
Take caution not to injure the peroneal nerve when dissecting near the posterior side of the biceps femoris muscle. Ligate the lateral superior genicular artery to prevent postoperative hematoma. Stay in a subperiosteal plane to avoid damage to the popliteal artery. Flex the knee to 90 degrees to ensure the popliteal artery falls posteriorly with the joint capsule.
Step 7: Expand Your Approach
Vigorously retract the vastus lateralis muscle towards the center of the knee with a right-angled retractor. This incision can be extended as needed, both proximally and distally. For iliotibial fascial grafts, use the proximal extensions of the incision.

The lateral approach to the distal femur, also known as the "over-the-top" approach, is used in conjunction with the medial parapatellar approach for repair or reconstruction of the anterior cruciate ligament (see the section regarding the medial parapatellar approach). This approach allows for exposure of the posterior aspect of the intercondylar notch by passing over the top of the posterior aspect of the lateral femoral condyle.
In addition, the lateral approach to the distal femur provides access to the lateral aspect of the lateral femoral condyle, allowing for the creation of drill holes in the condyle (if necessary) for reattachment of the femoral end of the anterior cruciate ligament or attachment of the femoral end of an anterior cruciate substitute.
Position of the Patient
To perform this procedure, place the patient supine on the table with a bolster under the thigh to maintain the knee in 30 degrees of flexion. Apply a tourniquet high on the patient’s thigh and exsanguinate the leg using a compression bandage or by elevating the leg before inflating the tourniquet.
Landmarks and Incision
Landmarks
Palpate the posterior lateral margin of the lateral femoral condyle as it flares out from the shaft of the femur. Observe the intersection between the iliotibial band and the biceps femoris muscle.
Incision
Create a 10-cm incision parallel to and over the indentation between the biceps femoris muscle and the iliotibial band. The distal end of the incision should reach the flare of the femoral condyle.
Internervous Plane
The dissection takes advantage of the internervous plane between the vastus lateralis muscle (supplied by the femoral nerve) and the biceps femoris muscle (supplied by the sciatic nerve; refer to Fig. 10-51).
Superficial Surgical Dissection
Incise the iliotibial band just anterior to the lateral intermuscular septum, in line with the skin incision. The incision should be slightly anterior to the skin incision itself.

Deep Surgical Dissection
Locate the vastus lateralis muscle anterior to the intermuscular septum and retract it anteriorly and medially. Below the muscle lies the lateral superior genicular artery, which must be ligated. Use cautery to incise the periosteum at the junction of the shaft and flare of the femur. Insert a small clamp or Cobb elevator behind the posterolateral flare of the lateral femoral condyle, staying in a subperiosteal plane. Carefully continue the dissection distally and medially over the top of the lateral femoral condyle until the instrument can be felt entering the intercondylar notch. Keep the instrument in contact with the bone and pass the tip anteriorly until it becomes visible in the knee, as seen from the anteromedial incision (medial parapatellar).
